JustinGuitar.com uses cookies to enhance your browsing experience. By continuing to use this site, you consent to the use of cookies. For more detailed information, please review the full Terms & Conditions.
You've made it to the F chord! Your first barre chord and the most notorious chord of them all.
MOST beginner guitar players will struggle with this! It might take you weeks, if not months, to master this chord. It's a process - so be patient with yourself!
The key is to get the finger placement right and to make the F chord ring out clearly. Then, you'll learn how to change chords to and from them and incorporate them in songs!
You'll want to effortlessly shift in and out of the F chord, like with your open chords! So, you've got to give your hand some time to strengthen and get familiar with the positioning.
This is why I'm introducing it pretty early on in Grade 2. The sooner you start working on this one, the better!
In this lesson, you'll learn everything you need to know to start playing the F chord. We'll look at the thumb position, wrist position, hand rotation, and much more! I'll also give you 6 valuable tips that will make the F chord a bit easier. :)
You know what they say - you never forget your first barre chord, especially when it's the F chord!
Barre chords get their name by the way you grip them. With them, your first finger lays down, barring across the strings.
Your first finger acts as the nut of your fretboard, moving it up to whichever fret you're barring across. This makes it easy to move up and down your fretboard.
Barre chords are awesome - they let you do much quicker chord changes and allow you to play loads of songs!
To get you started, here's how to position your hand. Place your 1st finger barring across the 1st fret. Your 2nd, 3rd, and 4th fingers are playing individual notes. Look at the chord shape in front of the barre - it should be the same as an E chord shape. The only difference is the fingering.
Use the diagram below to help guide you.
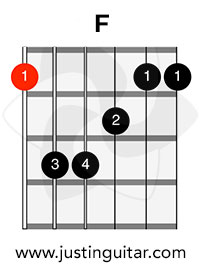
Try playing an E chord using your 2nd, 3rd, and 4th fingers. Then, move the entire shape up one fret and barre the 1st fret with your 1st finger.
Now, when you add the barre on the 1st fret, you're shifting everything in your Open E Shape chord up by one fret. An E chord moved up one fret becomes an F chord.
With the F chord, there are a few positioning challenges that you might encounter. Things might work better depending on your finger length and strength. How you interact with your guitar will also determine the best position!
You're fretting three of the middle strings. So, your first finger only needs to hit the thickest string and the thinnest two strings! This is great because it's challenging to play all six strings using only one finger!
Don't lay your 1st finger down completely flat and straight on. It should be leaning it slightly over to its side. Stay aware of where your knuckles and the fleshy parts of your finger sit on the strings. This will make sure you're getting the best sound out of those barred strings.
Now, you'll want to experiment a bit and position your finger wherever you find you get the best sound. Try and find a position so that your hand position is the most relaxed. This might look different from someone else's barre chord positioning. Don't compare yourself to others - and find what feels best for you. :)
Try not to place the first finger so high up that it hangs over the top of the fretboard by more than 1cm (half an inch). Your first finger should only be just over the edge of your fretboard.
When practicing the F chord, place your barre down first. Then, add the other fingers onto the strings. If you notice your fingers leaning over a bit while doing this - that's alright! Your fingers aren't used to this shape yet. Once again, it's all about finding a position that feels comfortable and makes the best sound.
Once you've got all your fingers in place, pick out each string individually to see that each one is ringing out. Then, strum the whole chord.
Yikes! Sounds off? Don't panic!
Your first F chord attempts might sound terrible - it likely WILL sound terrible! But this will get better with practice and patience. You've got to build up some muscles in your hand for this chord to sound good - and this takes time!
If you find your hand muscles a little sore, especially between your 1st finger and thumb - that's normal! You're growing your strength - and that's a good thing!
Here's how to find the perfect hand position. Place your fingers on the strings in position (2nd, 3rd, and 4th fingers first, and then the barred 1st finger). Then, relax your hand and your arm.
Pay attention to where you're tensing up, where it hurts, and where it feels awkward. Avoid soft fleshy bits of the finger. These are too soft to put the amount of pressure you need. Wobble your arm around and try to find the place that feels most comfortable. Then, press again and see if it's working on getting cleaner chord sounds.
Explore doing this - it will take you a few tries until it feels right. We all come in different shapes and sizes. So, you've got to focus on what works for your needs!
It can take time to find the right place for you! The beginning stages of most things can be a struggle. Remember that it will get better through time and practice! :)
Pay attention to the angle created at your wrist. Once you've got your fingers in position on the strings, you may notice that your wrist is almost at a 90-degree angle. This isn't great - it can be bad for your tendons. This can create pain and lead to carpal tunnel syndrome!
To soften that angle, try bringing your elbow back. Doing this will help relieve some of the arm strain and pressure from your hand by pulling back on the strings.
Try and use a mirror or a selfie camera to see make sure you have the right position!
With barre chords, you'll want a good amount of pressure on the strings with your fingers. To do this without straining the muscle, try pulling away from your fretboard with your arm. That little contribution can help add more pressure!
Pulling back just a little bit can make a huge difference - give it a go!
When fretting your F chord, take a look at where your thumb is on the neck of your guitar. Use your hand to create a lever. This helps press the strings down harder and with less effort!
Now, move your thumb higher up your guitar neck. This will make it more in line with your 2nd finger. Doing this will naturally rotate the wrist towards you.
It'll help add more pressure against the strings - and this means your 1st finger doesn't have to work so hard!
I know - there's a lot to think about when it comes to the F chord!
The most important thing to remember is to be patient with yourself! Practice makes permanent - so make sure you're learning this barre chord the right way. So, don't rush the process - and make sure your positioning is correct!
If you're lucky enough to have both an acoustic guitar and an electric guitar, I recommend that you alternate between your guitars to practice the F chord.
On the electric guitar, it's easier to get your fingers in a nice position and to figure out the positioning mechanics. With the acoustic guitar, you need a lot of strength to get the notes right out.
So, by alternating between the guitars, you get the strength element from using the acoustic guitar. With the electric guitar, it's easier to practice the correct position.
Now, here's a quick recap to help you practice:
- Position fingers first, then barre the strings
- Explore the best position of the barre to avoid soft fleshy bits of the finger
- Roll the barre slightly onto the side
- Check your wrist angle!
- Pull back slightly with your arm to help get pressure.
- Check the thumb position and explore the lever effect.
- Make sure you regularly relax your arm to find the perfect finger position for your anatomy!
I know I've said it already - but be patient with yourself! This is NOT one of those chords that you'll pick up immediately. Even once you can play it well, you've got to be able to play it within a song.
So, you'll be working on the F chord for a little while. Don't give up! If you need a little motivation - and a laugh - check out Nitsuj's attempt to play the F chord!