JustinGuitar.com uses cookies to enhance your browsing experience. By continuing to use this site, you consent to the use of cookies. For more detailed information, please review the full Terms & Conditions.
👋 Help shape the future of guitar learning by sharing your insights in our quick survey, and you could win a spot in Blues Immersion!
Grab your guitar, check it's in tune, get comfortable and lets get started... this is the very first step on a wonderful journey :) See more notes below and comprehensive FAQ at the bottom of this page!
Look at the chord box for the D chord below. The black dots are the places where you should position your fretting fingers.
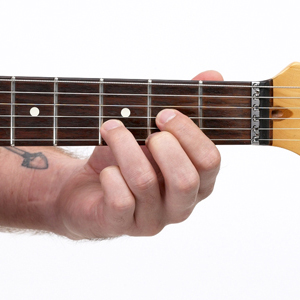
Try to place your fingers as shown, with the correct fingering. Most students find it is easier to arrange their fingers by number order, starting with your 1st finger. This method isn't that important, but try it and see if it works for you, Place your 1st finger on the third string, 2nd fret; the 2nd finger on the first string—also on the 2nd fret; and your 3rd finger on the second string on the 3rd fret.
Your fingers should be placed just behind the fret. If a finger is touching the fret, the note will sound dead or muted and if it is too far back from the wire the note will buzz. You may find that your fingers will not stretch to where you want them to go at first, but it won't take long for them to find the way to play it. Just let your hand get used to moving in ways that it may never have done before!
Also try to pay attention to the angles of the fingers, they're all generally pointing up, not horizontal! Also make sure that the fingers are round, like you're gripping a ball, each joint should have at least a little angle to it.
When you start playing it is better to keep your thumb placed behind the neck. Have it resting about 3/4 of the way toward the sixth (thickest) string, firmly planted on the pad of the thumb (not the tip). Your palm should not be touching anywhere. Got that? THE PALM OF YOUR LEFT HAND MUST NOT BE TOUCHING THE NECK! THIS IS REALLY IMPORTANT!
Check which strings should be played, and which strings you're going to leave. For the D chord, you should NOT play the thickest two strings. Remember, the X means that you don't play that string.
Have a go now and strum down with your pick from the fourth string down (towards the ground), remembering that the sixth string is the thickest string.
When you strum, be aware of where you start the strum from. Although it may seem like a lot to think about at the start, the eventual quality of your playing will be worth the little extra time to get it right. It will be tempting sometimes to just disregard it and strum away on your favourite tune. When this urge hits you, just do it. But when you PRACTISE then you need to be very careful about which notes you are hitting. Have a listen to what our D chord sounds like if all six strings are plucked: pretty rough, and it makes the chord muddy and unclear.
What you may need to do now is make some adjustments. Don't worry if the ends of your fingers get a bit sore. Take a short break if it bothers you too much. Check that each finger is not touching anywhere it should not. On this D chord it is quite common for your 3rd finger to be touching the first string, and stopping it sounding. If this is the case then try to angle the finger more directly down on the string with the tip of your finger. Try to let there be a small gap between the edge of your 1st finger and the fingerboard. Again, the palm of your left hand should not be touching the guitar neck anywhere.
One of the most important beginner's skills is to get your chords clear. I always teach students to strum, then pick out, and then strum again. This is the best way to check your chords and get them correct. You will use this method for all chords that you learn in the future! This is how all the chords are demonstrated on the CD.
Start by giving the chord a strum, then play each note individually, starting from the thickest string that you should play. Make any necessary adjustments that you need and then strum the chord again, getting it nice and clear. Take a break, and then try it again.
The hard part is getting the notes clear when you pick them one at a time. What might have sounded like a good chord can have quite a few notes missing that you will only discover when you try and pick them one at a time.
As you strum it the second time, with all the notes nice and clear, tell yourself that this is how you want the chord to sound. This will take some practice. There is no shortcut – you just have to put in the time to get it right.
You will find that there are other ways that you could finger each chord shape, and you might even find it easier another way. However, I strongly suggest that you start with the fingering that I show you here. It is going to help you with your chord changes and almost everyone plays the D Chord this way. James Taylor is the only big-name player I can think of that plays it differently. He swaps the 1st and 2nd fingers over, which is very unusual, and not recommended.
Your first chord is going to hurt. Sorry! Pressing your soft skin down on thin metal strings is going to be uncomfortable when you start. Everyone has to go through it, but it doesn't last! Remember not to play too much and wear out the skin or you'll have to have a few weeks off to let them heal. Just play a bit until they get sore, have a little rest and then come back to it.
It usually takes a month for the fingers to get used to it, though you should find it a lot less painful after just a couple of weeks.
You must try and memorize every chord you learn right away! You shouldn't need to look at this page after a week (at the very most) of playing. Try and get it into your head in 5 minutes or less. Just do it. It's no good having to look at the page – you will probably want to look at your fingers while you play when you start, and you can't look at both!
Strum this chord and play around with getting it sounding nice for 5 minutes or so. Have a bit of a play around and see what it sounds like.
Once you have this one under your fingers (but don't worry about getting it perfect yet!) then it's time to check out the next lesson!

Donations keep most of it free! By donating, you help people all over the world who can't afford guitar education!