JustinGuitar.com uses cookies to enhance your browsing experience. By continuing to use this site, you consent to the use of cookies. For more detailed information, please review the full Terms & Conditions.
📖 Food For Thought by Justin Sandercoe is here—transform your musical mindset and elevate your guitar journey! Get your copy now; stock is limited!
Here you will find scale diagrams for the five patterns of the Minor Pentatonic scale and tips on the fingerings for each - however, I repeat, You will be best learning these patterns in context over the first two Blues Lead Guitar modules Essential Blues Lead Guitar and All Over Blues Lead Guitar (which is all about using all five patterns all over the neck!).
With each scale I have discussed my preferences for fingering the scale. There are many approaches and so long as you have a logical one, it will be fine. I have a 'system' that works for me, and might work well for you too, but you need to experiment and find out what works best for you!
I also added notes on alternative shapes and fingerings that I know are in common usage and my reasons for choosing the ones I do. There is no right and wrong.
It's important to note that the fingering is very loose with the Minor Pentatonic, much more so than with other scales. Because this scale is more an alphabet and you need to learn words (licks) to use it to communicate - you'll find you use the fingering that helps you express the lick best! And bring in string bending, for which you'll very rarely (if ever) use Finger 4, and you'll end up changing the fingering for most of these patterns!
• DO IT SLOWLY AND GET IT RIGHT
Don't make any mistakes. Play it 10 times perfectly at a very slow speed and you will find you can speed it up without making mistakes and developing bad habits you will have to correct later.
• USE YOUR FINGERTIPS
Do not let your fingers "fold", use the tips the whole time, and definitely NO barres at any point. Ever.
• ALWAYS START AND END ON THE LOWEST ROOT NOTE
This will help train your ears into hearing the sound of the scale, very important. So start on the lowest (in pitch) root note, play up as far as you can, then go back down as low as you can, and then back up to the root note.
• LEARN THE PATTERNS (SHAPES) ONE AT A TIME
It is very important that you learn all five of these patterns... eventually, but please learn to make music with them. Much much better to be able to use one scale shape and play a solo than play five up and down and not be able to do make music with any them :)
A root note gives the scale its name. Look at any of the scales and arpeggios (and most chords) on this site and you will see an R on some notes. This is note that gives the scale its note name.
For example
Look at Pattern 1 below and notice that the R is on the 6th string (played with the Finger 1). Whatever note you put that one becomes the name of the scale. So place Finger 1 at the 3rd fret and you will play the G Minor Pentatonic Scale (because the note on the 3rd fret of the 6th string is the note G). Place Finger 1 on the 8th fret and you will play the C Minor Pentatonic Scale (because the note at the 8th fret of the 6th string is the note C).
Pattern 1 (CAGED Shape E)
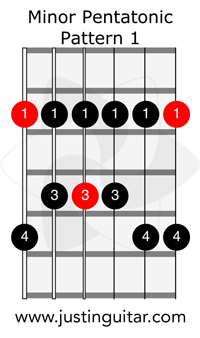
This is the most commonly learnt scale pattern. It is pretty easy to play.
Alternatives
Sometimes the notes on the first and second strings are played with the 3rd finger. I often play it that way, particularly further up the neck where it can get a bit cramped. This is also good for doing string bending as you will ALWAYS bend with your 3rd finger. But the version shown is better to learn first, especially as this may be the first scale you ever learn and stretching up with Finger 3 can be tricky for beginners. :)
Pattern 2 (CAGED Shape D)
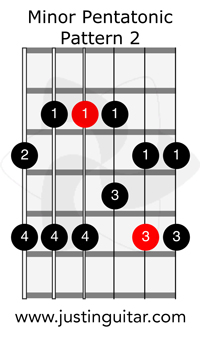
This shape has many cool blues licks in it, should be the second shape you learn.
Alternatives
I often see people playing the thinnest two strings with the 2nd and 4th fingers. Makes sense if the idea was just to play it fast but this scale is mostly used for blues, where you will bend a lot and want good control over the notes, hard to achieve with little finger. I'm confident that this is the best fingering by quite some way!
Video Lesson in Blues Lead Course Here
Pattern 3 (CAGED Shape C)
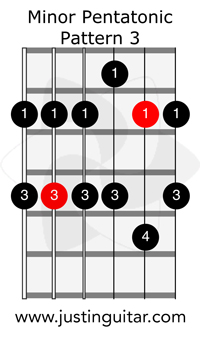
This is sometimes thought to be quite a hard pattern to solo in... it is until you learn some funky licks from this position, then it will be your friend..
Alternatives
Sometimes this one is played with just 1st and 3rd fingers all the way. That can be cool, but harder lower down the neck when the frets are further apart.
Pattern 4 (CAGED Shape A)
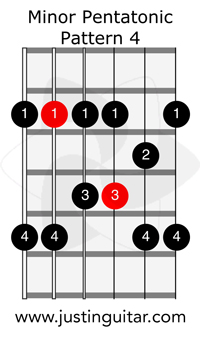
Lots and lots of cool licks in this pattern...
Alternatives
The most common alternative is play the two notes on the 2nd string with 1st and 3rd fingers. Not a bad plan but can be hard to play fast.
Sometimes first string is also played with 1st and 3rd fingers.
Video Lesson From Blues Lead Course Here
Pattern 5 (CAGED Shape G)
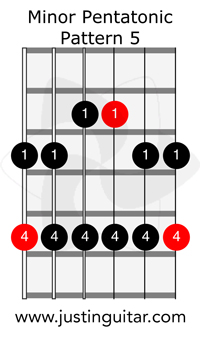
This is a funky pattern, can seem hard at first but again it has some cool licks in it if you look around enough.
Alternatives
I often see this played with the fingering 2,4 / 2,4 / 1,4 / 1,4 / 2,4 / 2,4 which I think is really stupid. Using the two weakest fingers for two thirds of the scale is really not a good idea at all.
Best alternative is to use 1st and 3rd fingers all the way. Or...
Use 1st and 3rd for strings 1, 2, 5 and 6 and 1st and 4th for the middle strings.
Most often the finger you use will be determined by the lick you are playing.

Play along a selection of popular strumming patterns curated by me or create your own interactive strumming patterns!