JustinGuitar.com uses cookies to enhance your browsing experience. By continuing to use this site, you consent to the use of cookies. For more detailed information, please review the full Terms & Conditions.
📖 Food For Thought by Justin Sandercoe is here—transform your musical mindset and elevate your guitar journey! Get your copy now; stock is limited!
If you’ve been learning to make music with me, you know the drill! Before you learn how to play Pattern 4 of the Major Scale, you should have memorized Pattern 1, Pattern 2, and Pattern 3. More than that - you should be able to make music out of them!
If you’re still not comfortable improvising with the patterns (I hope!) you already know, check out Grade 4 - Major Scale Maestro. Yep, the entire course is free - but donations make that happen! If you want to learn and you can afford it, please donate.
🚨 Learning a new pattern of the Major Scale will give you more room to improvise all over the guitar neck! But what’s the point of having more space if you can’t use what you already have?
So, if you’re feeling ready, grab your guitar, and let’s get started!
When learning a new pattern of the Major Scale, prioritize accuracy over speed. If you’re a JustinGuitar Student, you know it: get your scale down slowly but right. Speed will come over time after you’ve got things right in the first place. Don’t make any mistakes when practicing your scales!
🎸 Practice makes permanent, so practice perfectly!
Slow and right. But which one is the right way of playing Pattern 4 of the Major Scale? Let’s take a look!
The pattern that I suggest you start with when learning Pattern 4 is the one I call the default pattern. However, I decided to include two other variations you are likely to see around.
One of those variations might be better for you, but I suggest that you give them all a try. You should only move to one of the variations if you have a solid reason to do it! If you’re not sure, I suggest you stick with the default. You’ll have time later down the line to explore all the various scale pattern variations, and we’ll be studying the three notes per string system in Grade 6!
Breaking out of setting fingerings for scales is essential and will help you make real music. We talked about this when learning about One Finger Solos, remember?
💡 When you learn how to break out Major Scale patterns, you know how to make music. Instead of playing scales up and down, breaking down the patterns will help you develop a musical relationship with your scales. That’s a big deal!
At this stage of your journey, you need to start making decisions for yourself and figuring out why you might choose one finger over another. It might be difficult when you start - most things usually are - but it’s a necessary skill set.
I consider this one to be the default pattern for playing Pattern 4. If you’ve done your homework, you should be pretty familiar with that much of the shape! Take a look at the diagram below:
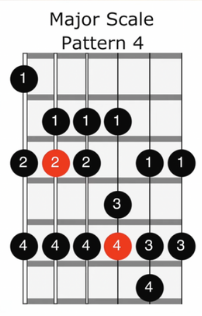
At this point, I expect you to be comfortable reading the pattern in chord box diagrams. If you’re not, wait no more! Check out my lesson on How to Read Fretboard Diagrams for Scales.
Make sure you get the default variation down - and that’s pretty solid! But it won’t hurt to taste the pattern variations and see if one clicks a lot better for you.
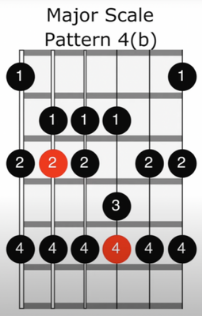
I call this first one The Berklee Variation. I first encountered this one in A Modern Method for Guitar by William G. Levitt, commonly referred to as The Berklee Book. :)
This variation starts just like the default pattern. But then, we keep finger 2 in the same fret the whole time. That brings some advantages, and it might even feel easier to play.
Most people find it easiest to reach back with finger 1, so keeping all the other fingers in position makes it feel good. But I don’t think it’s as good for note function visualization - seeing the scale notes around a chord shape. Take a look at the diagram:
This third variation also starts the same way as the default pattern. But, if you want to play this scale pattern in a consistent 16th Note and come back to the root note every time, you’ll need to choose. You can have three notes on the top or two notes on the bottom. Take a look at the following diagram:
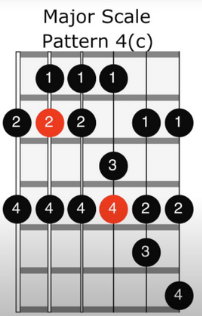
Now, I’m sure some of you will be asking: why can I have both? Well, you can - but not now. That would mean putting three notes on every string, and that’s a whole another system that we’ll learn in Grade 6.
Can you see the similarities between Patterns 4 and 1? Same fingering, same shape, but things always shifting up one fret when they hit the B String. The “B String Shift” will help you understand all the shapes on the guitar, scales, chords, arpeggios - everything! :) Want to learn more about the theory behind all of this? Check out the JustinGuitar Music Theory Course!
Ok, now it’s time for some practice! As you probably know, you should learn the pattern in chunks. Ensure you’ve got a piece down before moving on to the next one - no mistakes allowed! Your first step is to memorize the pattern. You must be able to play it perfectly, up and down, with your metronome. Once you’ve learned it, it’s time to make music.
If you’re reading this, I’m sure that you are cool with all the Major Scale patterns we’ve learned so far. Now it’s time to improvise, and you should explore all those tricks we’ve explored in Grade 4.

Play along a selection of popular strumming patterns curated by me or create your own interactive strumming patterns!