JustinGuitar.com uses cookies to enhance your browsing experience. By continuing to use this site, you consent to the use of cookies. For more detailed information, please review the full Terms & Conditions.
While you're still learning the F chord, I need to show you some helpful F chord cheats! These are F chord cheats - but it doesn't mean they won't be a challenge! Think of these as your get-out jail chords. ;)
These chords are a great substitute for the F chord most of the time, but you'll have to put your ear training to use to know what sounds best! If you're struggling to play a big F at some point, these will be great to substitute it!
In this lesson, you'll learn how to play these 3 F chord hacks:
These 3 chords are great on their own, and you might prefer a specific one depending on the chord changes or song.
So - grab your guitar, and give these a go!
This chord is a good substitute for the traditional F chord most of the time. But - you'll have to use your ears! Sometimes, it won't sound right in a particular tune. To help guide your finger positioning, use the diagram below. :)
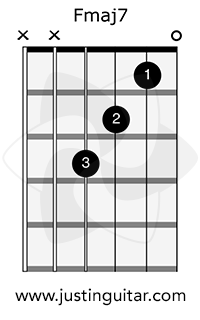
For this chord, you're only playing the thinnest four strings. Use your 3rd finger to help to mute the 5th string. If it rings out - it's not always the worst thing in the world! Don't play that low E string, though! It'll sound not very good.
Also, be careful not to mute the thinnest string with your 1st finger.
You may notice that this shape is like that of a C chord shape - they're both a little stretchy! That's actually a good chord change for you to practice - C to Fmaj7.
This one is an excellent, old-school chord that sounds a little fuller than the last one! It builds on the Fmaj7 chord - this time, you're fretting the 5th string instead of muting it.
You've got the full E chord shape going with your 2nd, 3rd, and 4th fingers. But instead of the barre on the 1st fret, you're only playing the 2nd string with the 1st finger. Mute the thickest string, and leave the thinnest string open.
Again, practice changing between this chord and a C chord. Take your time and make sure you get it right! Here's what it should look like on your fretboard:

Those numbers under the chord box are showing the function of the notes. Don't worry about it for now! You'll learn about that stuff later on!
This F chord hack is possibly the most useful of all 3. It might seem simple - but this one is also a challenge!
The mini F uses the thinnest four strings. Unlike the F major 7 chord, you're fretting the thinnest string rather than leaving it open.
To play the mini F Chord, create a mini barre with your 1st finger. Use it to play the thinnest two strings. Lay it down first, and then place the 2nd and 3rd fingers down. Again, you're going to avoid hitting those thickest two strings. Use your 3rd finger to help mute the 5th string.
Check out the diagram below - see how your 1st finger is only 'barring' two strings?

Sometimes, you'll see players adding a bass note by hanging their thumb over the top of the neck. Don't worry about this for now! It's much too tricky for beginners, and you'll do fine with sticking to your four fretted strings.
A good chord change to practice with the mini F chord is D to mini F. This change will involve all of your finger changing. It's something you'll want to add to your OMC exercise!
You've got to listen! When substituting one of these chords out for a full F chord, listen to which one sounds the best. If it doesn't sound great, try a different one.
Also, these chords are helpful on their own. So, even if you can play the regular F chord, these are still great to keep in your chord arsenal. Practice them - and practice them as soon as you can!
Even better - Start working on these using My Practice Routine. You'll be able to track how fast you can change in and out of these chords - and see proof of your progress throughout the weeks! That's always encouraging. :)
You can start with some of the suggested chord changes in this lesson. Then, you can see what some other common F chord changes in songs you'd like to play.
Remember - you might find these Grade 2 lessons more challenging than Grade 1 - but that's good! As you advance in your guitar journey, it's normal to spend more time on lessons. If you're not blowing through them like you were in previous lessons - don't worry about it! It's part of the journey. :)

Play along a selection of popular strumming patterns curated by me or create your own interactive strumming patterns!