JustinGuitar.com uses cookies to enhance your browsing experience. By continuing to use this site, you consent to the use of cookies. For more detailed information, please review the full Terms & Conditions.
📖 Food For Thought by Justin Sandercoe is here—transform your musical mindset and elevate your guitar journey! Get your copy now; stock is limited!
One of the main concepts that we're looking at in the Intermediate Foundation is Barre Chords. Playing them right, knowing where to find the root note and know which grip to put down, getting to them fast, moving them around easily and getting every note clean. We got a bit to do...
We checked out Power Chords as part of the Beginner's Course, so I hope you are familiar with the notes on the thickest two strings (The E and the A Strings). If you don't know the notes - go and revise them right now!
If you managed to play the full F Barre Chord then you should find these pretty easy... until we look at the minors! Have a look at the video and see how you go. Additional notes below!
The first grip we're looking at is the "E Shape. The name comes from the CAGED System, which although very interesting might be a bit heavy if you are fresh off the Beginners Course. If you look at this E Shape Barre Chord, you will see that the shape of the chord is the same as the Open E chord you know, and that is why it gets it's name.
You will almost certainly have trouble getting every note to ring out clearly when you start, but perseverance will prevail, so stick at it...
Check your chord by picking out each note one at a time and making sure that it rings out clearly, moving fingers a little to fix the notes if they are out, buzzing, muted or dead...
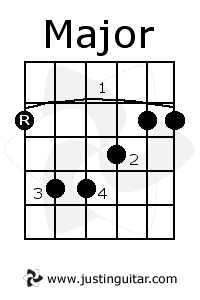 |
Make sure that your first finger (the barre) is slightly rolled over onto it's side (about 30 degrees) where the flesh is not as soft and it's closer to the bone. If the 3rd string is not ringing out it is most probably because the 4th finger is touching it. Curl it a bit more by moving your palm towards the sky! Think of getting the palm of your hand where your little finger meets your palm up close to the neck! If the 1st and 2nd strings are not ringing, check that your barre is straight next to the fret, often times people angle the barre and it's just too far from the fret to get the notes clean. If it's other notes - make sure the fingers are as close as possible to the frets and that no other fingers are touching the strings! Make sure that your thumb is at the back of the guitar neck (don't let it over the top!). It should be pressing hard, but not crazy hard - some of the work comes from the arm but the muscle between your thumb and first finger should still get quite a work out! |
There is only one note difference to make the Minor Chord - in fact you lift a finger off... but it's a bit harder! huh? Yep, you read right - it's harder. And the reason is that now the note on the 3rd string is played by the barre and for many people that is where the barre is a little flabby. The trick is just to adjust your barre position a little!
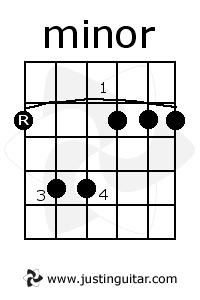 |
As you can see, the minor shape is the same as the Major but with your 2nd finger lifted off. If you have trouble getting the note on the 3rd string - try lifting the barre up toward the sky about 3-5mm - this works for most people. It's about finding the right way of placing your barre. We are all a bit different and have different shaped hands of different strengths, you have to find your way! Getting that note on the 3rd string (the hard one) is important because it is that note that makes the chord minor! - without it you are playing a kinda extended Power Chord! Once it is off you might want to use it to support the 1st finger barre, just press down on top of it. Some people see this as a bad habit... and it can be, but it can also be very helpful if you are really struggling. What works for you? Give yourself some time to let the muscles develop - this is hard stuff. |
When you are practicing this, you want to follow a similar pattern to the one we used when learning our chord in the Beginners Method...
1. Place the chord down.
2. Check each note.
3. If any notes are not ringing out clearly then try and figure out what is wrong, move your fingers a little to fix it!
4. Strum the chord.
5. Repeat lots.
Hope you are having fun with that. Once you have them sounding good, we're going to learn how to move them around!

before he tamed it down for public release. Would da Vinci be a massive fan of Rock guitar? 🧐 Nonetheless, my best-selling t-shirt is also a great conversation starter!