Transcribe is the written systematic representation of the spoken word. As I have explained in other lessons, music is very much a language and learning to write it is a very useful skill indeed.
In my opinion the best way of writing guitar parts accurately is guitar TAB with rhythmic notation written above it. Mainly because TAB shows you WHERE to play a note where as regular (dots) notation just tells you the note, not where to play it (on the guitar there are often many ways to play the same note).
So in this lesson I will show you how to write TAB and some tips for writing clearly and correctly. I am assuming that you have read TAB and understand the basics, if not please read How to read TAB.
OK, lets start with the basics.
RULE #1: Make sure it is clear for the reader!
This is the most important rule in writing music. I make all kinds of funny squiggles on my own tabs that I understand if they are meant only for me! If you are writing for someone else you need to stick to most conventions, but still - make it clear. You can describe all kinds of things if you think about it, and sometimes you might have to get unconventional!
Slurs are Hammer-ons and Flick-offs (more commonly called a Pull-off, I prefer the term flick-off because that is what you do, you don't pull anything!!). If the numbers are getting bigger they are hammer-ons and if they get lower lower they are flick-offs. Many people write a H or P to show it as a Hammer of Pull-off but I think this is completely unnecessary. The other main advantage of the curve is you can 'slur' a group mix of hammers and flicks. A Trill is moving fast between two notes, usually with a big curve over them and trill written, but sometimes written

Bends are shown many ways, most commonly with an arrow and then how far the bend goes, either written as full, tone or 1 (which would all mean a tone bend) or half, semi or 1/2 (which would all mean a semitone bend). I personally prefer full and 1/2, but often I just have the arrow for a tone bend (it's most common and just speeds things up a bit) and just write in half bends or ones larger than a tone!
Also note the "Curl" which is a very small bend (covered in the Blues Lead Guitar Course) and I write this with a little bend looking line without the arrow head and a C above the TAB lines.

Slides are usually written too, and be quite important when capturing the flavour of what has been played. They are usually written with a straight line between two specified notes, a slide can be either up or down, or can be a 'non-specific slide' which starts at any from 1 to 10 frets below or above but finishes on the note shown.

Mutes notes are written with an X. Sometimes you will see them in a group (like a chord) where all the strings have been muted and the strings strummed. They are nearly always just approximations, you can't be that accurate transcribing (well I can't be anyhow) but a good transcriber will use logic to work out which were probably played, so you must use your won judgment. Other times you will see them leading up to a note as a 'rake', which means two notes are played muted before getting to the main note, Rake is usually written but may not be.

Some people like to write out vibrato too, you can use a small squiggle for a small vibrato and a wide squiggle for a wide vibrato, though often the vibrato is not written in... it's the kind of thing that is so complex you are better learning that with your ears than your eyes... but it can be useful to write it out just so you pay attention to it. I sometimes write in increasing vibrato if it is obvious.

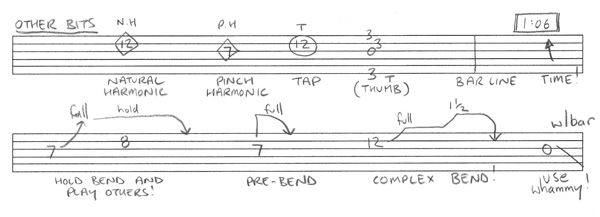
Other things you might see include Harmonics (a triangle around a note) which are most commonly marked with N.H for Natural Harmonic or P.H for Pinch Harmonic, Finger Tapping (a square or circle around a note), Thumbing which is playing a note with your fretting hand thumb (usually shown with a T next to the note). Also note Bar Lines which go right across the TAB and also Time Stamps which I put above the TAB in a little box. I usually put them at the start of every page of a multiple page transcription or anytime I think it will be useful (like a bit I need to come back to and check later!).
Bends can also be a lot more complex than those simple ones shown above. Bend and Hold is usually marked with a line showing how long to hold it for, hold being written above. A Pre-Bend is where the bend is made before picking the note and is usually shown with a line straight up before the arrow coming down. Complex Bends are where the bend changes pitch without coming back down (Another Brick In The Wall solo has some awesome examples of this), the main rule here being just make sure it is clear what to do! Writing down use of the Whammy Bar seems to differ depending on the book or magazine you read, I just use straight lines and write in w/bar (with bar) but up to you on that one... we won't be doing any Whammy Bar action on this course!
These exercises are purely about writing out the TAB, we're not doing any real transcribing yet, we'll start that next session! Part of the deal with this is the copying, by imitation you will learn to write neatly and clearly. It is important to keep it neat and tidy because it will make it easy if you want to:
1. Write the A minor Pentatonic Scale as TAB... a few times.
Just write it up and down, back wards, any way you like really, just write it, a full page of it. Get used to writing your TAB down and keeping it well spaced and neat and tidy! When you finished, take a look at it, and ask yourself:
Things to notice:
Download PDF file of TR-102-A and compare yours!!
2. Identify all of the markings on this.
Do you understand all the writing on this page? Which are bends, hammer-ons, flick-off (most people call them pull-offs), harmonics, staccato notes, muted notes, tapped notes, vibrato, etc. Write on the page with red pen and make sure you understand everything. Can you play it?
If you have to write something that you don't know how to do "officially" then just write it in as I did then for a "Pick Slide" at the end. As long as it is clear you will be fine!
Download PDF file of TR-102-B, print it out and circle with a red pen and name every mark!!
3. Rewrite the above example
Just for practice, re-write the whole of the exercise TR-102-B onto a blank page (page 2 of the pdf file!!) so that get used to writing all the marks neat and tidy.
4. Write TAB for your favourite riff or solo (that you already know from memory).
Don't go for anything too complicated, just pick some kind of single note (not chords) riff or solo and try and write it out. Just for the experience or writing it out. Is it good enough to give someone else and they would understand it? Do more if you like!!
Downloads PDF file: Blank TAB.